I stared at my deck last April and felt guilty. The wood was gray and weathered. Splinters everywhere. Whatever stain we’d put on three years before was basically gone. I told myself I’d fix it, then summer arrived and we were grilling out there twice a week and I wasn’t about to shut down the deck for an entire weekend.
Fall finally makes sense for this kind of home improvement project. We’re not using the deck constantly anymore. The weather here in Monmouth County, NJ, is still good, not blazing hot, not freezing yet. And if you get it done before winter, your deck’s protected and ready when spring shows up.
I’m not a professional. I’ve done this twice now. Made plenty of mistakes the first time. Figured some things out the second time around. If your deck looks like mine did and you’re trying to decide if this is something you can tackle yourself, here’s what actually happens.
Power Washing Your Deck Before The Snow
Power Washing Is Harder Than It Looks
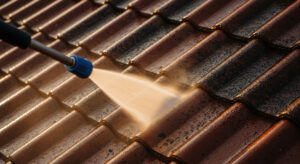
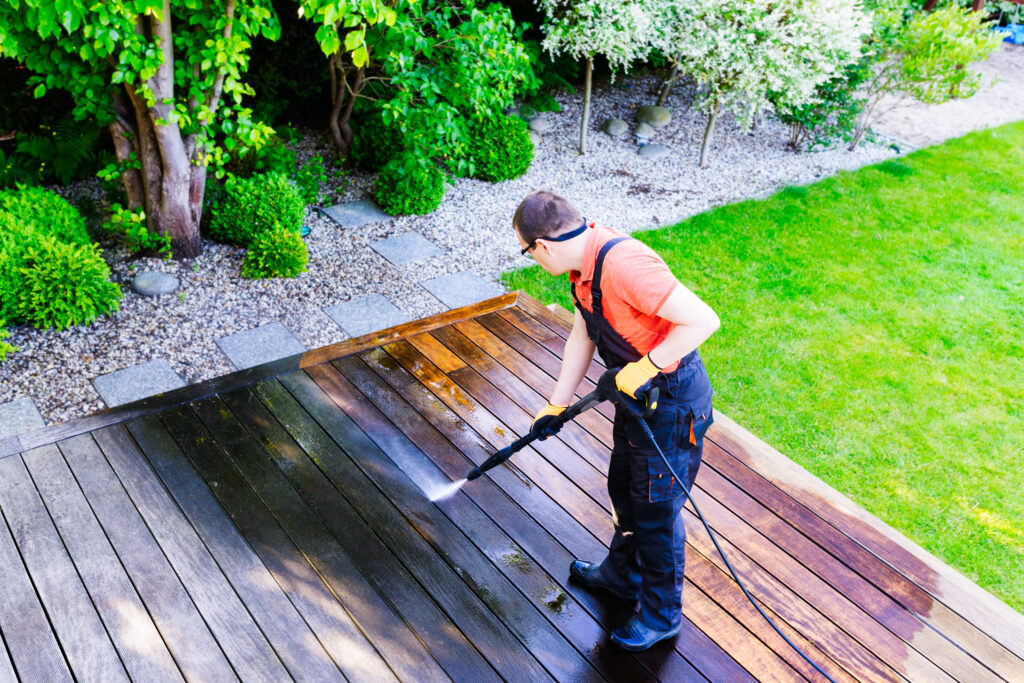
Rented a power washer from Home Depot. Thought our 12×16 deck would take maybe two hours. Took six. The machine is incredibly loud. Your arms get tired holding it. And you will absolutely spray yourself at some point, no matter how careful you are.
Deck powerwashing strips off old stain, dirt, mildew, and that weathered gray layer. You have to do this before staining. Can’t just put a new stain over dirty, old wood. It won’t stick. Peels off in weird patches within a few months. I know because I tried shortcuts the first time.
I started with the power washer on full blast. Big mistake. Gouged the wood in several spots. Actually damaged it. Had to sand those areas smooth later, which added hours to the project. Most decks need around 1,200 to 1,500 PSI. The rental place should be able to tell you what setting to use.
Hold the nozzle maybe 6 to 8 inches from the deck. Closer and you risk damaging the wood as I did. Further away, and it doesn’t clean properly. Keep moving steadily; letting it sit in one spot creates grooves. Work with the wood grain, not across it.
You’re getting wet. There’s no avoiding it. The spray bounces back, especially if there’s any wind. I wore old jeans and a shirt I didn’t care about. Made the mistake of wearing flip-flops the first time and got completely shredded by debris flying everywhere. Closed-toe shoes. Learn from my stupidity.
Let the deck dry completely before doing anything else. Not just look dry, actually dry all the way through. This takes at least two days in decent weather. Longer if it’s humid. I didn’t wait long enough for my first attempt. The stain didn’t absorb right in some areas and I had to strip those sections and redo them.
Staining Makes a Massive Difference
The transformation from weathered deck to freshly stained is honestly shocking. Brings back the color, protects the wood, and makes your entire backyard look better.
Two main types: transparent and solid. Transparent lets you see the wood grain through it. Solid covers everything, more like paint. I went transparent because I like seeing the actual wood. Solid lasts longer but doesn’t look as natural. Totally your preference.
Pick a stain based on sun exposure. Our deck is in full sun most of the day, so I used one with UV protection specifically for that. Shaded decks have different problems—more mildew issues, so you want a stain with mildewcide in it.
You can apply with a brush, roller, or sprayer. I used a sprayer for the main boards and a brush for railings and detailed areas. Sprayer was way faster, but I burned through the stain quickly. Brush gives more control and wastes less, but takes forever on a big surface.
Work in sections. Don’t try to do the whole thing at once, or you get lap marks where wet overlaps dry. I did maybe 3 or 4 boards at a time. Back-brushing after spraying works the stain into the wood better and gets rid of drips.
Don’t pile it on thick. I thought more stain meant better protection. Wrong. Too much sits on the surface, gets tacky, and doesn’t dry properly. You want the wood to soak it in. One solid coat is usually enough. Some products need two—actually read the can instead of guessing as I did initially.
Weather Ruins Everything If You’re Not Careful
Temperature matters way more than I realized. Too hot, and the stain dries before it absorbs. Too cold and it doesn’t dry at all. You want 50 to 85 degrees. Fall around here usually hits that sweet spot.
Don’t stain if rain’s coming within 24 hours. I obsessively checked weather forecasts before starting. Every source said clear for three days. Rained 18 hours after I finished staining. Messed up whole sections. Had to redo probably a third of the deck. Check multiple forecasts. Still might get screwed.
Avoid working in direct sunlight if you can. Early morning or late afternoon is better than midday. The stain goes on smoother when the wood isn’t baking hot from the sun.
Sealing Is What Makes It Last
Some stains have a sealer built in. Some don’t. Mine didn’t, so I needed a separate clear sealer after the deck staining was done. This adds protection that repels water and keeps the stain from fading as fast.
Wait until the stain is bone dry before sealing. At least a full day, maybe two, depending on the temperature. I touched the deck in a corner. If any color comes off on your hand, it’s not ready yet.
Sealer goes on like a stain. I used a roller this time because it was faster than a brush and easier to control than the sprayer. Two thin coats beat one thick coat. Let the first completely dry before doing the second.
Deck sealing is what makes this whole pain-in-the-ass project actually last. Without it, your stain fades fast and you’re back where you started within a year. With a decent sealer, you might get three or four years before having to do this again.
What You’ll Actually Spend
Power washer rental is $50 to $100 for the day, depending on where you go. Stain runs $30 to $60 per gallon. How much you need depends on your deck size; one gallon covers roughly 200 square feet for one coat. Sealer costs about the same.
Our 12×16 deck cost me around $200 in materials plus the rental. Hiring someone would’ve been $800 to $1,200 minimum. The difference is your time and labor. This is not a quick Saturday morning project.
Took me a full weekend. Saturday for power washing, then waiting for it to dry. Sunday for staining. Following Saturday, I went back and sealed it. If your deck is bigger or this is your first time, expect it to take longer.
Was It Worth It?
My deck looked amazing when I finished. The wood looked new again. Smooth, protected, nice to walk on barefoot. Neighbors actually commented on it, which never happens. My wife was thrilled, which made the sore back and tired arms worth it.
Fall really is the right time for this. The weather cooperates most days. You’re not giving up prime grilling season. And there’s something satisfying about crossing a major project off your list before winter hits and everything gets harder.
Just don’t rush it. Let stuff dry properly between steps. Obsessively check the weather. Take your time with the actual work. I rushed parts the first time and paid for it by having to redo sections.
Your deck will look incredible when you’re done. And next spring, when everyone else is looking at their gray, splintery decks and putting it off again, yours will be ready to go.